0%

ElasticSearch:全文搜索引擎,它可以快速存储,搜索和分析海量数据,用户包括:维基百科、Stack Overflow、GitHub

特点:不需要简表,配置字段等;只需要存json的文档;

通过docker安装

1
docker pull docker.elastic.co/elasticsearch/elasticsearch:7.5.0
1
docker run -p 9200:9200 -p 9300:9300 -e "discovery.type=single-node" docker.elastic.co/elasticsearch/elasticsearch:7.5.0

安装成功之后访问http://localhost:9200/即可见到对应信息

链接参考
docker安装ElasticSearch

3mysql

数据库分表
水平分表:假设分成256张文件表,按文件Sha1值后两位来切分,则以:tb_${FILE_SHA1}[:-2]的规则到对应表进行存取。

// OnFileUploadFinished : 文件上传完成,保存meta (插入)
// GetFileMeta : 从mysql获取文件元信息(查询)
// UpdateFileLocation : 更新文件的存储地址(如文件被转移了) (更新)
涉及源码:db(file.go mysql(conn.go))

使用MySQL小结:
通过sql.DB来管理数据连接对象
通过sql.Open来创建协程安全的sql.DB
优先使用Prepared Statement

4-1用户系统用户表设计(注册和登录)

由于原有情况下,唯一索引用在了字段phone上. 而当前插入表的sql语句中, user_name才是应该要保持唯一的, 因此相对于视频所演示的建表语句进行了更新, 具体如下:

1
2
3
4
5
6
7
8
9
10
11
12
13
14
15
16
CREATE TABLE `tbl_user` ( 
`id` int(11) NOT NULL AUTO_INCREMENT,
`user_name` varchar(64) NOT NULL DEFAULT '' COMMENT '用户名',
`user_pwd` varchar(256) NOT NULL DEFAULT '' COMMENT '用户encoded密码',
`email` varchar(64) DEFAULT '' COMMENT '邮箱',
`phone` varchar(128) DEFAULT '' COMMENT '手机号',
`email_validated` tinyint(1) DEFAULT 0 COMMENT '邮箱是否已验证',
`phone_validated` tinyint(1) DEFAULT 0 COMMENT '手机号是否已验证',
`signup_at` datetime DEFAULT CURRENT_TIMESTAMP COMMENT '注册日期',
`last_active` datetime DEFAULT CURRENT_TIMESTAMP ON UPDATE CURRENT_TIMESTAMP COMMENT '最后活跃时间戳',
`profile` text COMMENT '用户属性',
`status` int(11) NOT NULL DEFAULT '0' COMMENT '账户状态(启用/禁用/锁定/标记删除等)',
PRIMARY KEY (`id`),
UNIQUE KEY `idx_username` (`user_name`),
KEY `idx_status` (`status`)
) ENGINE=InnoDB DEFAULT CHARSET=utf8mb4;

登录
// 1. 校验用户名及密码
// 2. 生成访问凭证(token)
// 3. 登录成功后重定向到首页
涉及源码:
db(user.go )
handle(user.go)

访问鉴权(验证token的拦截器)
handler(auth.go)

5.hash算法对比以及秒传原理

6.Redis

分块上传与断点续传
分块上传:文件切成多块,独立上传,上传完成后合并(初始化上传->上传分块(并行)->通知上传完成)
断点续传:传输暂停或一场终端后,可基于原来进度重传

小文件不建议分块上传
可以并行上传分块,并且可以无序传输
分块上传能极大提高传输效率
减少传输失败后重试的流量和时间

初始化分块信息
上传分块
通知分块上传完成
取消上传分块
查看分块上传的整体状态

涉及源码:
cache(redis(conn.go))

handler(mpupload.go)

7.Ceph

Ceph:redhat开源出来的分布式存储系统

8.阿里云对象存储OSS

8-3 OSS术语

oss01.png

8-4 OSS网页具体操作

9.RabbitMQ

RabbitMQ:一种开源的消息代理

10.微服务

微服务架构图

基于gin改造用户service

go-micro

源码说明:

  • master分支: 通过原生net/http实现各接口功能
  • gin分支: 通过Gin框架来改造(微服务化章节之后主要基于Gin框架来进行演示)
  • pkg分支: 通过go-bindata等工具实现静态资源打包的一个示例
  • 第九章(RabbitMQ异步存储)章节的代码,可以下载标签为v0.3的版本
  • 第八章(OSS)及之前章节的代码,可以下载标签为v0.2的版本

参考资料

then and done

典型使用:

1
2
3
4
5
6
7
firstly {
login()
}.then { creds in
fetch(avatar: creds.user)
}.done { image in
self.imageView = image
}

如果这段代码使用了completion handlers,它将如下所示:

1
2
3
4
5
6
7
8
9
login { creds, error in
if let creds = creds {
fetch(avatar: creds.user) { image, error in
if let image = image {
self.imageView = image
}
}
}
}

then 只是构造completion handlers的另一种方式, 但也远不止如此。在我们理解的最初阶段,它主要有助于可读性。上面的promise链很容易浏览和理解:一个异步操作一行一行地通向另一个。鉴于Swift的当前状态,它尽可能接近程序代码。

donethen ,但是你不能返回一个promise. 这通常是链条中success部分的终点. 上面, 您可以看到我们在 done 时收到了最终的图像,并使用它来设置用户界面。

两种实现方法的比较:

1
2
3
4
5
6
func login() -> Promise<Creds>

// Compared with:

func login(completion: (Creds?, Error?) -> Void)
// ^^ ugh. Optionals. Double optionals.

区别在于,对于Promise,您的函数返回Promise,而不是接受和运行回调。链中的每个handler都会返回一个PromisePromise对象定义了then方法,该方法在链的执行之前等待Promise的完成。锁链按程序解决,一次一个Promise

Promise 代表异步任务的返回值。它有一个表示它包装的对象类型的类型。例如,在上面的例子中,login是一个返回Promise的函数,该Promise将代表Creds实例。

Note: done is new to PromiseKit 5. We previously defined a variant of then that
did not require you to return a promise. Unfortunately, this convention often confused
Swift and led to odd and hard-to-debug error messages. It also made using PromiseKit
more painful. The introduction of done lets you type out promise chains that
compile without additional qualification to help the compiler figure out type information.


您可能会注意到,与completion模式不同,promise链似乎
忽略errors。事实并非如此!事实上,它有相反的效果:promise
链使得errors处理更容易访问,也使得errors更难忽略。

catch

有了promise,errors就会沿着promise链级联,确保你的应用程序
健壮,代码清晰:

1
2
3
4
5
6
7
8
9
firstly {
login()
}.then { creds in
fetch(avatar: creds.user)
}.done { image in
self.imageView = image
}.catch {
// any errors in the whole chain land here
}

Swift emits a warning if you forget to catch a chain. But we’ll
talk about that in more detail later.

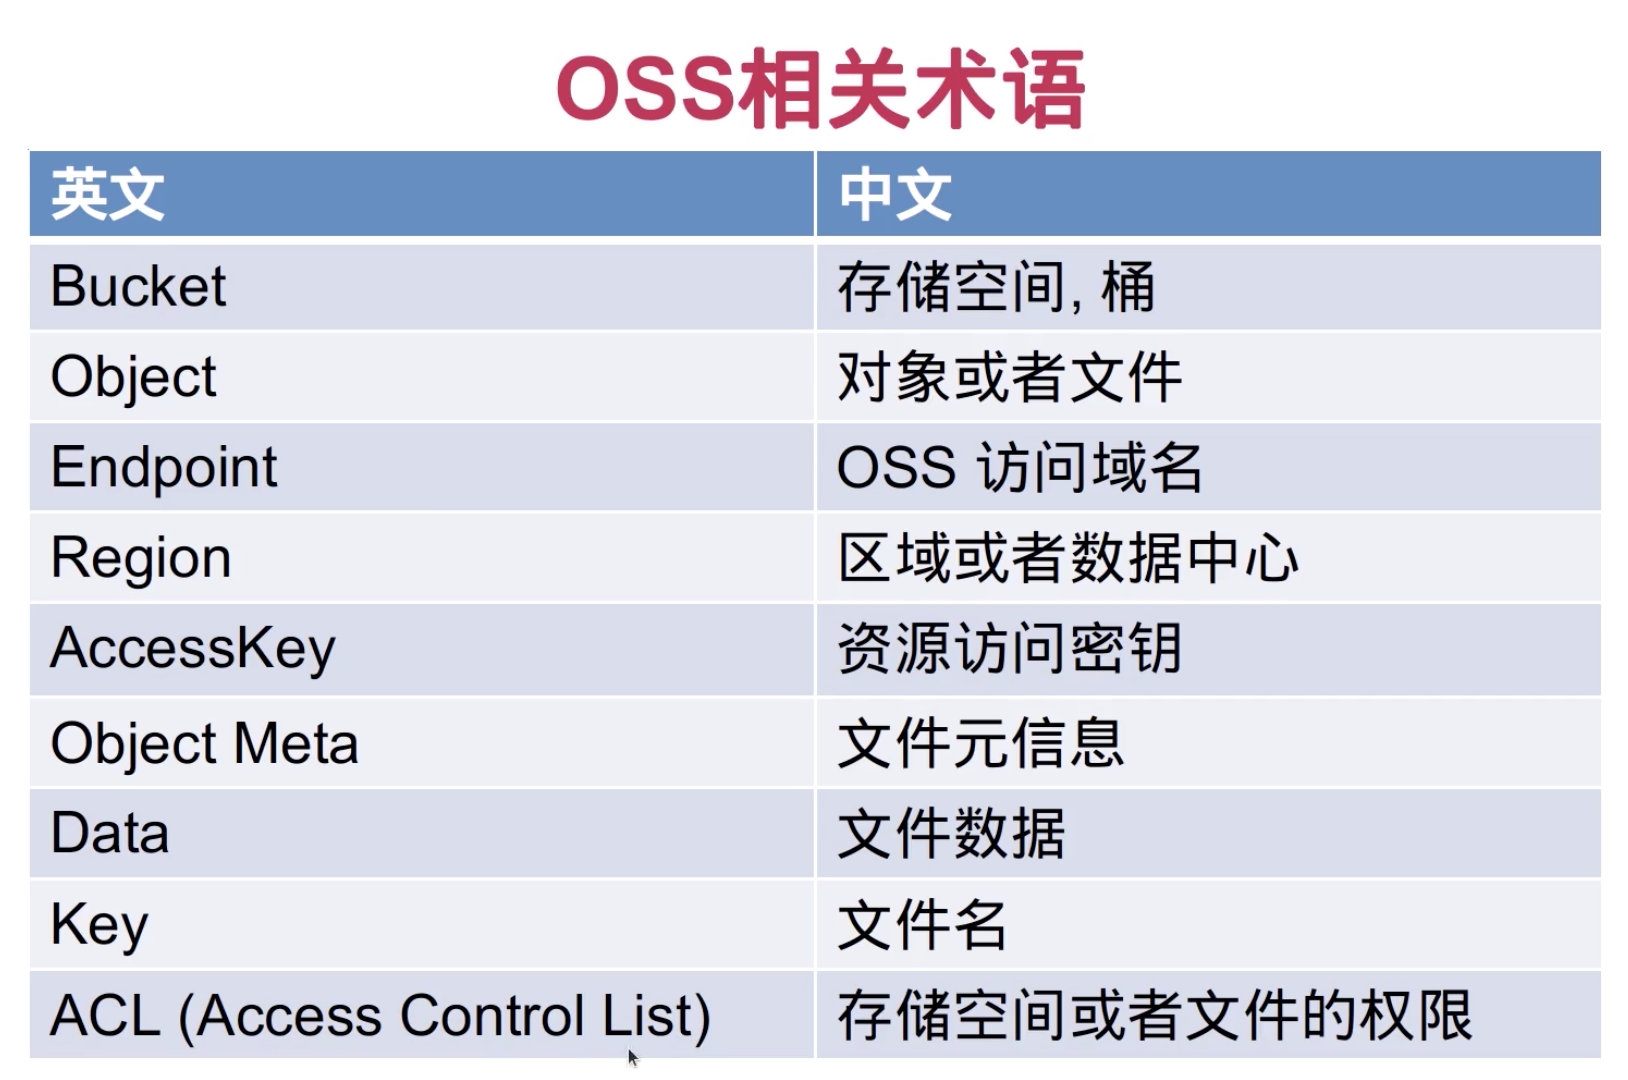
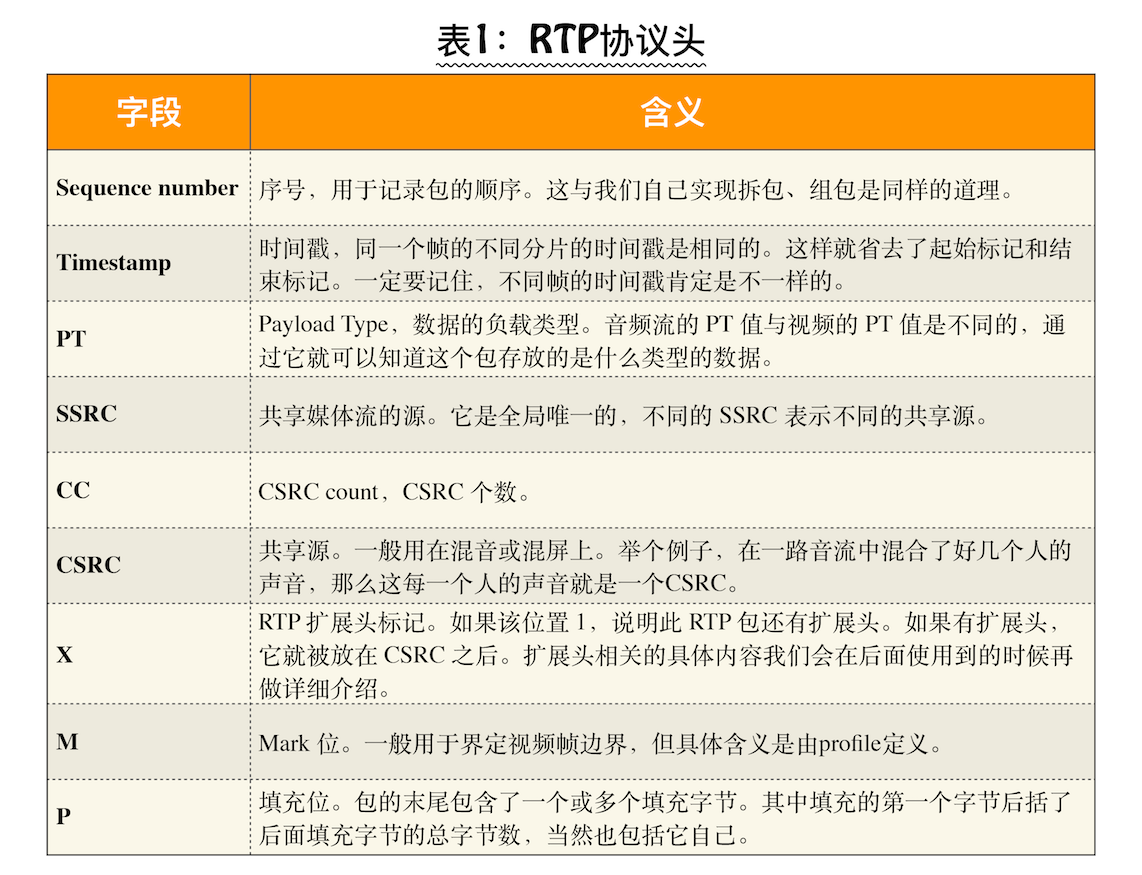
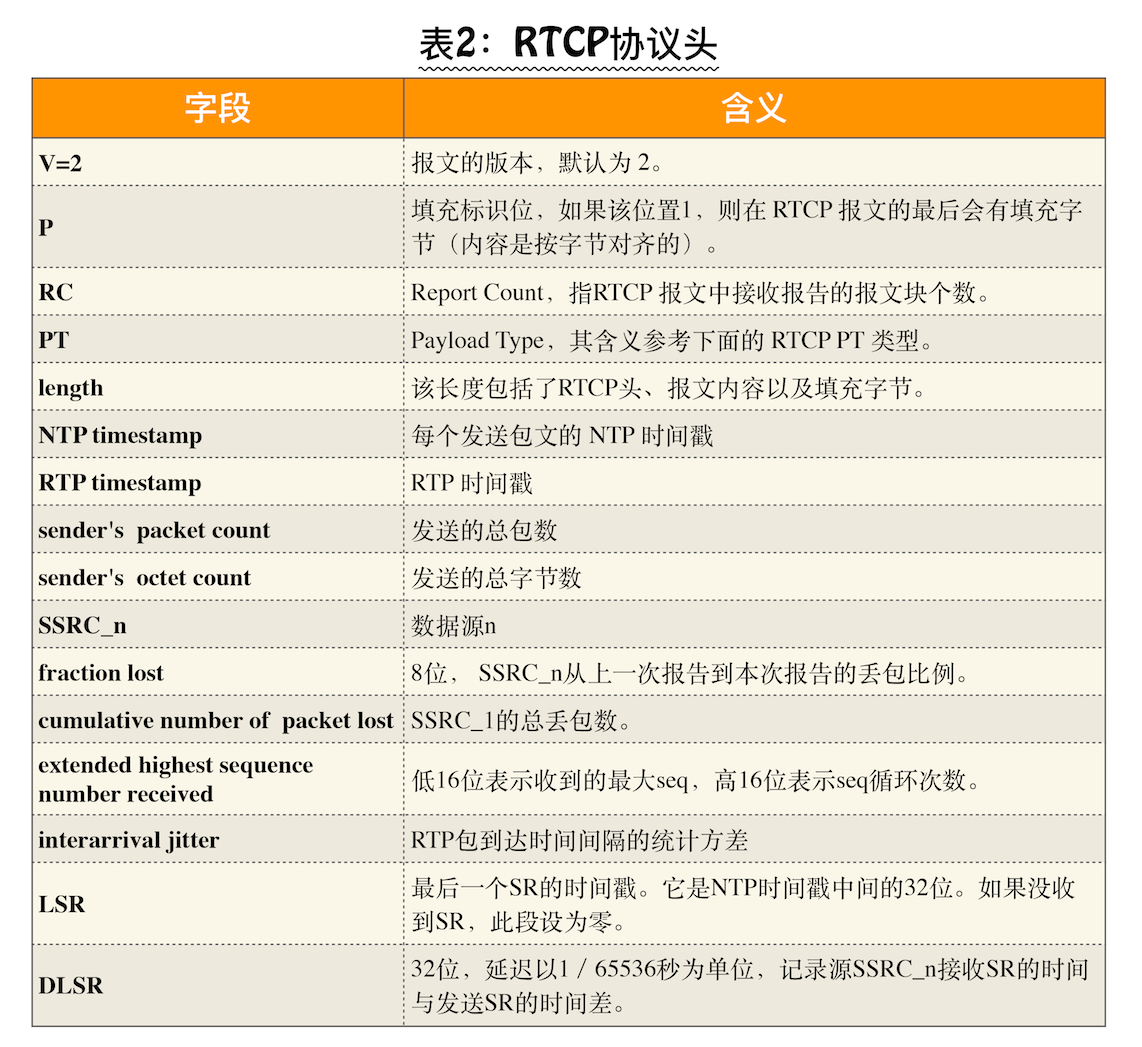
每个promise都是一个对象,代表一个单独的异步任务。
如果任务失败, promise就会变成rejected。 Chains that contain rejected
包含rejected的promise链跳过所有后续的promise。相反,执行下一个捕获。
(严格来说,所有后续的捕获处理程序都会被执行。)

completion handlerpromise的比较

1
2
3
4
5
6
7
8
9
10
11
func handle(error: Error) {
//…
}

login { creds, error in
guard let creds = creds else { return handle(error: error!) }
fetch(avatar: creds.user) { image, error in
guard let image = image else { return handle(error: error!) }
self.imageView.image = image
}
}

guarderror handler的使用有所帮助,但是promise链
可读性不言自明。

ensure

我们已经学会了合成异步性。接下来,让我们扩展:

1
2
3
4
5
6
7
8
9
10
11
12
firstly {
UIApplication.shared.isNetworkActivityIndicatorVisible = true
return login()
}.then {
fetch(avatar: $0.user)
}.done {
self.imageView = $0
}.ensure {
UIApplication.shared.isNetworkActivityIndicatorVisible = false
}.catch {
//…
}

不管你的链条的结果是什么——失败还是成功 ensure
handler 总是被调用.

ensure模式与其等价的完成处理程序进行比较:

1
2
3
4
5
6
7
8
9
10
11
12
13
14
15
UIApplication.shared.isNetworkActivityIndicatorVisible = true

func handle(error: Error) {
UIApplication.shared.isNetworkActivityIndicatorVisible = false
//…
}

login { creds, error in
guard let creds = creds else { return handle(error: error!) }
fetch(avatar: creds.user) { image, error in
guard let image = image else { return handle(error: error!) }
self.imageView.image = image
UIApplication.shared.isNetworkActivityIndicatorVisible = false
}
}

对某人来说,修改这个代码并忘记取消设置是非常容易的
导致错误的活动指示器。有了promises,这种类型的错误是
几乎不可能:Swift编译器拒绝你在没有
使用promises。您几乎不需要审查拉动式请求。

Note: PromiseKit has perhaps capriciously switched between the names always
and ensure for this function several times in the past. Sorry about this. We suck.

You can also use finally as an ensure that terminates the promise chain and does not return a value:
您也可以使用finally作为结束的promise链且不返回值的ensure:

1
2
3
4
5
6
7
8
9
10
11
spinner(visible: true)

firstly {
foo()
}.done {
//…
}.catch {
//…
}.finally {
self.spinner(visible: false)
}

when

对多个异步操作的completion handlers反应是缓慢的,意味着连续执行:

1
2
3
4
5
operation1 { result1 in
operation2 { result2 in
finish(result1, result2)
}
}

快速(parallel)路径代码使代码不太清晰

1
2
3
4
5
6
7
8
9
10
11
12
13
14
15
16
var result1: …!
var result2: …!
let group = DispatchGroup()
group.enter()
group.enter()
operation1 {
result1 = $0
group.leave()
}
operation2 {
result2 = $0
group.leave()
}
group.notify(queue: .main) {
finish(result1, result2)
}

如果使用Promises就更清晰了:

1
2
3
4
5
firstly {
when(fulfilled: operation1(), operation2())
}.done { result1, result2 in
//…
}

when promise代表:等待它们解决并返回包含结果的promise。

与任何promise链一样,如果任何组件promise失败,该链将调用下一个catch

PromiseKit Extensions

当我们使用PromiseKit, 我们是想想通过promise来实现
异步行为。因此,只要有可能,我们会对苹果的APIs进行扩展,重新构建
promise方面的应用编程接口。例如:

1
2
3
4
5
6
7
firstly {
CLLocationManager.promise()
}.then { location in
CLGeocoder.reverseGeocode(location)
}.done { placemarks in
self.placemark.text = "\(placemarks.first)"
}

要使用这些扩展,您需要指定子代码:

1
2
3
pod "PromiseKit"
pod "PromiseKit/CoreLocation"
pod "PromiseKit/MapKit"

All of these extensions are available at the PromiseKit organization.
Go there to see what’s available and to read the source code and documentation. Every file and function
has been copiously documented.

We also provide extensions for common libraries such as Alamofire.

Making Promises

The standard extensions will take you a long way, but sometimes you’ll still need to start chains
of your own. Maybe you’re using a third party API that doesn’t provide promises, or perhaps you wrote
your own asynchronous system. Either way, it’s easy to add promises. If you look at the code of the
standard extensions, you’ll see that it uses the same approach described below.

标准的扩展会让你走很长一段路,但是有时候你仍然需要启动链
你自己的。也许你使用的是不提供promises的第三方应用编程接口,或者你写道
你自己的异步系统。不管怎样,添加promises都很容易。如果你看看
标准扩展,您会看到它使用了下面描述的相同方法。

Let’s say we have the following method:

1
func fetch(completion: (String?, Error?) -> Void)

How do we convert this to a promise? Well, it’s easy:

1
2
3
func fetch() -> Promise<String> {
return Promise { fetch(completion: $0.resolve) }
}

You may find the expanded version more readable:

1
2
3
4
5
6
7
func fetch() -> Promise<String> {
return Promise { seal in
fetch { result, error in
seal.resolve(result, error)
}
}
}

The seal object that the Promise initializer provides to you defines
many methods for handling garden-variety completion handlers. It even
covers a variety of rarer situations, thus making it easy for you to add
promises to an existing codebase.

Note: We tried to make it so that you could just do Promise(fetch), but we
were not able to make this simpler pattern work universally without requiring
extra disambiguation for the Swift compiler. Sorry; we tried.

Note: In PMK 4, this initializer provided two parameters to your closure:
fulfill and reject. PMK 5 and 6 give you an object that has both fulfill and
reject methods, but also many variants of the method resolve. You can
typically just pass completion handler parameters to resolve and let Swift figure
out which variant to apply to your particular case (as shown in the example above).

Note Guarantees (below) have a slightly different initializer (since they
cannot error) so the parameter to the initializer closure is just a closure. Not
a Resolver object. Thus do seal(value) rather than seal.fulfill(value). This
is because there is no variations in what guarantees can be sealed with, they can
only fulfill.

Guarantee<T>

Since PromiseKit 5, we have provided Guarantee as a supplementary class to
Promise. We do this to complement Swift’s strong error handling system.

Guarantees never fail, so they cannot be rejected. A good example is after:

1
2
3
4
5
firstly {
after(seconds: 0.1)
}.done {
// there is no way to add a `catch` because after cannot fail.
}

Swift warns you if you don’t terminate a regular Promise chain (i.e., not
a Guarantee chain). You’re expected to silence this warning by supplying
either a catch or a return. (In the latter case, you will then have to catch
at the point where you receive that promise.)

Use Guarantees wherever possible so that your code has error handling where
it’s required and no error handling where it’s not required.

In general, you should be able to use Guarantees and Promises interchangeably,
We have gone to great lengths to try and ensure this, so please open a ticket
if you find an issue.


If you are creating your own guarantees the syntax is simpler than that of promises;

1
2
3
4
5
6
7
func fetch() -> Promise<String> {
return Guarantee { seal in
fetch { result in
seal(result)
}
}
}

Which could be reduced to:

1
2
3
func fetch() -> Promise<String> {
return Guarantee(resolver: fetch)
}

map, compactMap, etc.

then provides you with the result of the previous promise and requires you to return
another promise.

map provides you with the result of the previous promise and requires you to return
an object or value type.

compactMap provides you with the result of the previous promise and requires you
to return an Optional. If you return nil, the chain fails with
PMKError.compactMap.

Rationale: Before PromiseKit 4, then handled all these cases, and it was
painful. We hoped the pain would disappear with new Swift versions. However,
it has become clear that the various pain points are here to stay. In fact, we
as library authors are expected to disambiguate at the naming level of our API.
Therefore, we have split the three main kinds of then into then, map and
done. After using these new functions, we realized this is much nicer in practice,
so we added compactMap as well (modeled on Optional.compactMap).

compactMap facilitates quick composition of promise chains. For example:

1
2
3
4
5
6
7
8
9
10
firstly {
URLSession.shared.dataTask(.promise, with: rq)
}.compactMap {
try JSONSerialization.jsonObject($0.data) as? [String]
}.done { arrayOfStrings in
//…
}.catch { error in
// Foundation.JSONError if JSON was badly formed
// PMKError.compactMap if JSON was of different type
}

Tip: We also provide most of the functional methods you would expect for sequences,
e.g., map, thenMap, compactMapValues, firstValue, etc.

get

We provide get as a done that returns the value fed to get.

1
2
3
4
5
6
7
firstly {
foo()
}.get { foo in
//…
}.done { foo in
// same foo!
}

tap

We provide tap for debugging. It’s the same as get but provides the
Result<T> of the Promise so you can inspect the value of the chain at this
point without causing any side effects:

1
2
3
4
5
6
7
8
9
firstly {
foo()
}.tap {
print($0)
}.done {
//…
}.catch {
//…
}

Supplement

firstly

We’ve used firstly several times on this page, but what is it, really? In fact,
it is just syntactic sugar.
You don’t really need it, but it

Vue官网

第一个Vue程序

在教程安装里给出了多种引入方式,具体点击这里

直接</script>引入

在编辑器上输入html回车,这时候就会自动补全以下代码

1
2
3
4
5
6
7
8
9
10
<!DOCTYPE html>
<html lang="en" dir="ltr">
<head>
<meta charset="utf-8">
<title></title>
</head>
<body>

</body>
</html>

引入 Vue

1
2
<!-- 开发环境版本,包含了有帮助的命令行警告 -->
<script src="https://cdn.jsdelivr.net/npm/vue/dist/vue.js"></script>

在页面输出hello Vue,用浏览器打开文件并检验效果<div>hello Vue</div>

可以之后我们改造源文件让它与Vue产生关联:new 一个Vue实例

1
2
3
4
5
6
7
8
<script type="text/javascript">
new Vue({
el: '#app', //挂载到指定节点上
data: {
message: 'Hello Vue!'
}
})
</script>

所挂载的节点需要添加一个id<div id="app"></div>

最终源码

1
2
3
4
5
6
7
8
9
10
11
12
13
14
15
16
17
18
19
20
21
22
23
24
25
26
27
28
29
30
31
32
33
34
35
36
37
38
39
40
41
<!DOCTYPE html>
<html lang="en">

<head>
<meta charset="UTF-8">
<meta name="viewport" content="width=device-width, initial-scale=1.0">
<meta http-equiv="X-UA-Compatible" content="ie=edge">
<title>Document</title>
</head>

<body>
<div id="app">
{{message}} {{message + message}}
<div :id="message"></div>
<ul>
<li v-for="item in list">
<span v-if="!item.del">{{item.title}}</span>
<span v-else style="text-decoration: line-through">{{item.title}}</span>
<button v-show="!item.del">删除</button>
</li>
</ul>
</div>
<script src="https://cdn.jsdelivr.net/npm/vue/dist/vue.js"></script>
<script>
var vm = new Vue({
el: '#app',
data: {
message: 'hello world',
list: [{
title: '课程1',
del: false
}, {
title: '课程2',
del: true
}],
}
})
</script>
</body>

</html>

此时用浏览器打开即可见到显示Hello Vue!

参考官方demo 链接

添加方法

添加显示

1
2
3
4
<div class="addMethod">
<input type="text" name="" value="" v-model="info">
<button type="button" name="button" @click="handleClick">add</button>
</div>

其中

  • v-model是Vue里面的双向绑定,
  • v-for是循环遍历
  • @click=”handleClick” 绑定方法
  • console.log(this.info) 打印信息,如何查看打印输出:浏览器-右键-检查-Console
  • handleClick方法生命在methods对象里面
1
2
3
4
5
6
7
8
9
10
11
12
13
14
15
16
17
18
19
20
21
22
23
24
25
26
27
28
29
30
31
32
33
34
35
36
37
38
39
40
41
<!DOCTYPE html>
<html lang="en" dir="ltr">
<head>
<meta charset="utf-8">
<title></title>
</head>
<body>

</body>

<div id="app">
{{ message }}
<div class="addMethod">
<input type="text" name="" value="" v-model="info">
<button type="button" name="button" @click="handleClick">add</button>
</div>
<ul>
<li v-for="item in list">{{item}}</li>
</ul>
</div>
<!-- 开发环境版本,包含了有帮助的命令行警告 -->
<script src="https://cdn.jsdelivr.net/npm/vue/dist/vue.js"></script>

<script type="text/javascript">
new Vue({
el: '#app', //挂载到指定节点上
data: {
message: 'Hello Vue!',
info: '',
list:[],
},
methods: {
handleClick(){
//console
this.list.push(this.info)
this.info = ''
}
}
})
</script>
</html>

使用自定义组件

定义名为 todo-item 的新组件

1
2
3
4
Vue.component('todo-item',{
props:['item'],
template: '<li class="item">{{item}}</li>'
})

创建一个 todo-item 组件的实例,并传递属性值 v-bind:item="item"或者简写成:item="item"
<todo-item v-for="item in list" :item="item"></todo-item>

1
2
3
4
5
6
7
8
9
10
11
12
13
14
15
16
17
18
19
20
21
22
23
24
25
26
27
28
29
30
31
32
33
34
35
36
37
38
39
40
41
42
43
44
45
46
47
48
49
50
<!DOCTYPE html>
<html lang="en" dir="ltr">
<head>
<meta charset="utf-8">
<title></title>
<style media="screen">
.item {
color:red;
}
</style>
</head>
<body>

</body>

<div id="app">
{{ message }}
<div class="addMethod">
<input type="text" name="" value="" v-model="info">
<button type="button" name="button" @click="handleClick">add</button>
</div>
<ul>
<todo-item v-for="item in list" :item="item">{{item}}</todo-item>
</ul>
</div>
<!-- 开发环境版本,包含了有帮助的命令行警告 -->
<script src="https://cdn.jsdelivr.net/npm/vue/dist/vue.js"></script>

<script type="text/javascript">
Vue.component('todo-item',{
props:['item'],
template: '<li class="item">{{item}}</li>'
})
new Vue({
el: '#app', //挂载到指定节点上
data: {
message: 'Hello Vue!',
info: '',
list:[],
},
methods: {
handleClick(){
console.log(this.info)
this.list.push(this.info)//往list数组添加数据
this.info = ''//每次点击add的同时,清空输入框
}
}
})
</script>
</html>

以上操作有几个缺点

  • 全局定义:强制要求每个component中的命名不得重复
  • 字符串模版:缺乏语法高亮,在html有多行的时候,需要用\
  • 不支持CSS:意味着当html和JavaScript组件化时,CSS明显被遗漏
  • 没有构建步骤:限制只能用html和ES5 JavaScript,而不能使用预处理器,如Pug(formerly Jade)和Babel,即每次都需要手动在浏览器上刷新,没有自动热更新。

npm安装

安装Vuebash npm install vue

安装命令行工具 (CLI)Vue CLI

npm install -g @vue/cli

出现安装问题

1
2
3
4
5
6
7
8
npm WARN deprecated joi@14.3.1: This module has moved and is now available at @hapi/joi. Please update your dependencies as this version is no longer maintained an may contain bugs and security issues.
npm WARN deprecated topo@3.0.3: This module has moved and is now available at @hapi/topo. Please update your dependencies as this version is no longer maintained an may contain bugs and security issues.
npm WARN deprecated hoek@6.1.3: This module has moved and is now available at @hapi/hoek. Please update your dependencies as this version is no longer maintained an may contain bugs and security issues.
npm WARN deprecated cross-spawn-async@2.2.5: cross-spawn no longer requires a build toolchain, use it instead
npm ERR! Unexpected end of JSON input while parsing near '...TGOVzYcDOP1jLScCp0ACN'

npm ERR! A complete log of this run can be found in:
npm ERR! /Users/sam/.npm/_logs/2019-04-29T01_23_19_163Z-debug.log

清楚一下缓存npm cache clean --force

运行vue --version出现版本信息则说明安装成功

创建新项目vue create my-app

使用默认安装

1
2
3
4
Vue CLI v3.7.0
? Please pick a preset: (Use arrow keys)
❯ default (babel, eslint)
Manually select features

启动项目

1
2
cd my-app
npm run serve
1
2
3
4
5
6
7
8
9
10
11
12
13
14
15
16
17
18
19
20
21
22
23
24
25
26
27
28
29
30
31
32
33
34
35
36
37
38
39
40
41
42
43
44
45
46
47
48
49
50
51
52
53
54
55
56
57
58
59
60
61
62
63
64
65
66
67
68
69
70
71
72
73
74
> my-app@0.1.0 serve /Users/sam/Documents/studyUp/my-app
> vue-cli-service serve

INFO Starting development server...
98% after emitting CopyPlugin .
DONE Compiled successfully in 6412ms 上午9:53:14


App running at:
- Local: http://localhost:8080/
- Network: http://192.168.43.116:8080/

Note that the development build is not optimized.
To create a production build, run npm run build.
```


打开localhost:8080即可见到效果。


## 目录介绍

![image.png](https://upload-images.jianshu.io/upload_images/3850802-8fcdd44c56b23d35.png?imageMogr2/auto-orient/strip%7CimageView2/2/w/1240)


其中

1 node_modules 整个项目的依赖

2 pubic ico 图标

3 pubic index.html 整个项目的载体<div id="app"></div> 跟上面👆直接`</script>`引入的div一样

4 src 整个项目的源代码

5 Main.js 项目入口文件

6 babel.config.js babel配置

7 package.json 依赖包版本

8 说明


将上面的直接</script>引入的demo改成单文件形式👇三个模块独立

- 模版 template
- 逻辑 script
- 样式 style


<style scoped>样式作用域只在该文件内有效


在App.vue文件的模版中替换`div`内容,新建主件TodoItem.vue,在App.vue引入并使用


```bash
<template>
<li class="item">{{item}}</li>
</template>

<script>
export default {
props: ['item'],
}
</script>

<style scoped>
.item {
color: red;
}
</style>
1
2
3
4
5
6
7
8
9
10
11
12
13
14
15
16
17
18
19
20
21
22
23
24
25
26
27
28
29
30
31
32
33
34
35
36
37
38
39
40
41
<template>
<div id="app">
{{ message }}
<div class="addMethod">
<input type="text" name="" value="" v-model="info">
<button type="button" name="button" @click="handleClick">add</button>
</div>
<ul>
<todo-item v-for="item in list" :key="item" :item="item">{{item}}</todo-item>
</ul>
</div>
</template>

<script>
import TodoItem from './components/TodoItem.vue' //引入TodoItem
export default {
name: 'app',
data() {
return {
message: 'hello vue',
info: '',
list: [],
}
},

methods: {
handleClick() {
this.list.push(this.info)
this.info = ''
}
},

components: {
TodoItem, //注册TodoItem
}

}
</script>

<style>
</style>
1
<todo-item v-for="item in list" :key="item" :item="item">{{item}}</todo-item>

上面👆是通过属性来传递item,下面👇改成插槽的方式

1
<span style="font-size:20px">{{item}}</span>

此时解析由<li class="item"></li>改成

1
2
3
<li class="item">
<slot></slot>
</li>

或者给插槽一个名字(具名插槽)

1
2
3
4
5
<todo-item v-for="item in list" :key="item">
<template id="" v-slot:item >
<span style="font-size:20px">{{item}}</span>
</template>
</todo-item>
1
2
3
4
5
<template>
<li class="item">
<slot name="item"></slot>
</li>
</template>

作用域插槽(使用场景:由子控件传递值给父控件,供父控件使用修改显示,选中由红变蓝)

1
2
3
4
5
<todo-item v-for="item in list" :key="item">
<template id="" v-slot:item="itemProps"> 获取checked的值
<span :style="{fontSize:'20px', color: itemProps.checked ? 'red' : 'blue' }">{{item}}</span>
</template>
</todo-item>
1
2
3
4
5
6
<template>
<li class="item">
<input type="checkbox" v-model="checked">
<slot name="item" v-bind="{{checked}}"></slot> //将checked 传递出去
</li>
</template>

动手复制代码跑来看看效果吧 👇👇👇👇👇👇👇👇👇

1
2
3
4
5
6
7
8
9
10
11
12
13
14
15
16
17
18
19
20
21
22
23
<template>
<li class="item">
<input type="checkbox" v-model="checked">
<slot name="item" v-bind="{checked}"></slot>
</li>
</template>

<script>
export default {
props: ['item'],
data() {
return {
checked:false
}
}
}
</script>

<style scoped>
.item {
color: red;
}
</style>
1
2
3
4
5
6
7
8
9
10
11
12
13
14
15
16
17
18
19
20
21
22
23
24
25
26
27
28
29
30
31
32
33
34
35
36
37
38
39
40
41
42
43
44
45
<template>
<div id="app">
{{ message }}
<div class="addMethod">
<input type="text" name="" value="" v-model="info">
<button type="button" name="button" @click="handleClick">add</button>
</div>
<ul>
<todo-item v-for="item in list" :key="item">
<template id="" v-slot:item="itemProps">
<span :style="{fontSize:'20px', color: itemProps.checked ? 'red' : 'blue' }">{{item}}</span>
</template>
</todo-item>
</ul>
</div>
</template>

<script>
import TodoItem from './components/TodoItem.vue' //引入TodoItem
export default {
name: 'app',
data() {
return {
message: 'hello vue',
info: '',
list: [],
}
},

methods: {
handleClick() {
this.list.push(this.info)
this.info = ''
}
},

components: {
TodoItem, //注册TodoItem
}

}
</script>

<style>
</style>

条件渲染

条件渲染官方文档地址
v-if
v-else
v-show
v-for

组件基础&组件注册

组件基础

组件注册

1
2
3
4
5
6
7
8
9
10
11
12
13
14
15
16
17
18
19
20
21
22
23
24
25
26
27
28
29
30
31
32
33
34
35
36
37
38
39
40
41
42
43
44
45
46
47
48
49
50
51
52
53
54
55
56
57
58
59
60
61
62
63
64
65
66
67
68
69
70
71
72
<!DOCTYPE html>
<html lang="en">

<head>
<meta charset="UTF-8">
<meta name="viewport" content="width=device-width, initial-scale=1.0">
<meta http-equiv="X-UA-Compatible" content="ie=edge">
<title>Document</title>
</head>

<body>
<div id="app">
{{message}} {{message + message}}
<div :id="message"></div>
<!-- <ul>
<todo-item v-for="item in list" :title="item.title" :del="item.del"></todo-item>
</ul> -->
<todo-list></todo-list>
</div>
<script src="https://cdn.jsdelivr.net/npm/vue/dist/vue.js"></script>
<script>
Vue.component('todo-item', {
props: {
title: String,
del: {
type: Boolean,
default: false,
},
},
template: `
<li>
<span v-if="!del">{{title}}</span>
<span v-else style="text-decoration: line-through">{{title}}</span>
<button v-show="!del">删除</button>
</li>
`,
data: function() {
return {}
},
methods: {

},
})
Vue.component('todo-list', {
template: `
<ul>
<todo-item v-for="item in list" :title="item.title" :del="item.del"></todo-item>
</ul>
`,
data: function() {
return {
list: [{
title: '课程1',
del: false
}, {
title: '课程2',
del: true
}],
}
}
})
var vm = new Vue({
el: '#app',
data: {
message: 'hello world',

}
})
</script>
</body>

</html>

在Vue中,组件:小型的,一个个独立,可以复用的UI模块。它有三大概念:属性、事件、插槽

属性

Prop

  • 自定义属性props
    • 组件props中声明的属性
  • 原生属性attrs
    • 没有生命的属性,默认自动挂载到组件根元素上
    • 设置inheritAttrs 为false可以关闭自动挂载
  • 特殊属性 class、style
    • 挂载到组件根元素上
    • 支持字符串、对象、数组等多种语法
1
2
3
4
5
6
7
8
9
10
11
12
13
14
15
16
17
18
19
20
21
22
23
24
25
26
27
28
29
30
31
32
33
34
35
36
37
38
39
40
41
42
43
44
45
46
47
48
49
50
51
<template>
<div>
name: {{ name }}
<br />
type: {{ type }}
<br />
list: {{ list }}
<br />
isVisible: {{ isVisible }}
<br />
<button @click="handleClick">change type</button>
</div>
</template>

<script>
export default {
name: "PropsDemo",
// inheritAttrs: false,
// props: ['name', 'type', 'list', 'isVisible'],
props: {
name: String,
type: {
validator: function(value) {
// 这个值必须匹配下列字符串中的一个
return ["success", "warning", "danger"].includes(value);
}
},
list: {
type: Array,
// 对象或数组默认值必须从一个工厂函数获取
default: () => []
},
isVisible: {
type: Boolean,
default: false
},
onChange: {
type: Function,
default: () => {}
}
},
methods: {
handleClick() {
// 不要这么做、不要这么做、不要这么做
// this.type = "warning";
// 可以,还可以更好
this.onChange(this.type === "success" ? "warning" : "success");
}
}
};
</script>

事件

事件处理

  • 普通时间

    • @click,@input,@change,@xxx等事件
    • 通过this.$emit(‘xxx’,…)触发
  • 修饰符事件

    • @input.trim,@click.stop,@submit.prevent 等
    • 一般用于原生html元素,自定义组件需要自行开发支持
1
2
3
4
5
6
7
8
9
10
11
12
13
14
15
16
17
18
19
20
21
22
23
24
25
26
27
28
29
30
31
32
33
34
35
36
37
38
39
40
41
42
43
44
45
46
47
48
49
50
51
52
53
54
55
56
57
58
59
60
61
62
63
64
65
66
67
68
69
70
71
72
73
74
75
76
77
78
79
80
81
82
83
84
85
86
87
88
89
90
91
92
93
94
95
96
97
98
99
100
101
102
103
104
105
106
107
108
109
110
111
112
113
114
115
116
117
118
119
120
<template>
<div>
name: {{ name || "--" }}
<br />
<input :value="name" @change="handleChange" />
<br />
<br />
<div @click="handleDivClick">
<button @click="handleClick">重置成功</button>&nbsp;&nbsp;&nbsp;
<button @click.stop="handleClick">重置失败</button>
</div>
</div>
</template>

<script>
export default {
name: "EventDemo",
props: {
name: String
},
methods: {
handleChange(e) {
this.$emit("change", e.target.value);
},
handleDivClick() {
this.$emit("change", "");
},
handleClick(e) {
// 都会失败
//e.stopPropagation();
}
}
};
</script>
```


```bash
<!DOCTYPE html>
<html lang="en">

<head>
<meta charset="UTF-8">
<meta name="viewport" content="width=device-width, initial-scale=1.0">
<meta http-equiv="X-UA-Compatible" content="ie=edge">
<title>Document</title>
</head>

<body>
<div id="app">
{{message}} {{message + message}}
<div :id="message"></div>
<!-- <ul>
<todo-item v-for="item in list" :title="item.title" :del="item.del"></todo-item>
</ul> -->
<todo-list></todo-list>
</div>
<script src="https://cdn.jsdelivr.net/npm/vue/dist/vue.js"></script>
<script>
Vue.component('todo-item', {
props: {
title: String,
del: {
type: Boolean,
default: false,
},
},
template: `
<li>
<span v-if="!del">{{title}}</span>
<span v-else style="text-decoration: line-through">{{title}}</span>
<button v-show="!del" @click="handleClick">删除</button>
</li>
`,
data: function() {
return {}
},
methods: {
handleClick(e) {
console.log('点击删除按钮')
this.$emit('delete', this.title)
}
},
})
Vue.component('todo-list', {
template: `
<ul>
<todo-item @delete="handleDelete" v-for="item in list" :title="item.title" :del="item.del"></todo-item>
</ul>
`,
data: function() {
return {
list: [{
title: '课程1',
del: false
}, {
title: '课程2',
del: true
}],
}
},
methods: {
handleDelete(val) {
console.log('handleDelete', val)
}
}
})
var vm = new Vue({
el: '#app',
data: {
message: 'hello world',

}
})
</script>
</body>

</html>

插槽

插槽

  • 普通插槽
    • <template slot="xxx">...</template>
    • <template v-slot:xxx>...</template>
  • 作用域插槽
    • <template slot="xxx" slot-scope="props">...</template>
    • <template v-slot:xxx="props">...</template>
1
2
3
4
5
6
7
8
9
10
11
12
13
14
15
16
17
18
19
20
21
22
23
24
25
26
27
28
29
30
31
32
33
34
35
36
37
38
39
40
41
42
43
44
45
46
47
48
49
50
51
52
53
54
55
56
57
58
59
60
61
62
63
64
65
66
67
68
69
70
71
72
73
74
75
76
77
78
79
80
81
82
83
84
85
86
87
88
89
90
91
92
93
94
95
96
97
98
99
100
101
102
103
104
105
106
107
108
109
110
111
112
113
114
115
116
117
118
119
120
121
122
123
124
125
126
127
128
129
130
131
132
133
134
135
136
137
138
139
140
141
142
143
144
145
146
147
148
149
150
151
152
153
154
155
156
157
158
159
<template>
<div>
<slot />
<slot name="title" />
<slot name="item" v-bind="{ value: 'vue' }" />
</div>
</template>

<script>
export default {
name: "SlotDemo"
};
</script>
```

我们可以理解为万物皆“属性”,即它们都是父组件传递给子组件,然后子组件根据传递的内容来执行对应的行为。请看demo

```bash
<template>
<div>
{{ name }}
<br />
<button @click="handleChange">change name</button>
<br />
<!-- {{ slotDefault }} -->
<VNodes :vnodes="slotDefault" />
<br />
<VNodes :vnodes="slotTitle" />
<br />
<VNodes :vnodes="slotScopeItem({ value: 'vue' })" />
</div>
</template>

<script>
export default {
name: "BigProps",
components: {
VNodes: {
functional: true,
render: (h, ctx) => ctx.props.vnodes
}
},
props: {
name: String,
onChange: {
type: Function,
default: () => {}
},
slotDefault: Array,
slotTitle: Array,
slotScopeItem: {
type: Function,
default: () => {}
}
},
methods: {
handleChange() {
this.onChange("Hello vue!");
}
}
};
</script>

```


```bash
<!DOCTYPE html>
<html lang="en">

<head>
<meta charset="UTF-8">
<meta name="viewport" content="width=device-width, initial-scale=1.0">
<meta http-equiv="X-UA-Compatible" content="ie=edge">
<title>Document</title>
</head>

<body>
<div id="app">
{{message}} {{message + message}}
<div :id="message"></div>
<!-- <ul>
<todo-item v-for="item in list" :title="item.title" :del="item.del"></todo-item>
</ul> -->
<todo-list>
<todo-item @delete="handleDelete" v-for="item in list" :title="item.title" :del="item.del">
<template v-slot:pre-icon="{value}">
<span>前置图标 {{value}}</span>
</template>

</todo-item>
</todo-list>
</div>
<script src="https://cdn.jsdelivr.net/npm/vue/dist/vue.js"></script>
<script>
Vue.component('todo-item', {
props: {
title: String,
del: {
type: Boolean,
default: false,
},
},
template: `
<li>
<slot name="pre-icon" :value="value"></slot>
<span v-if="!del">{{title}}</span>
<span v-else style="text-decoration: line-through">{{title}}</span>
<slot name="suf-icon">😄</slot>
<button v-show="!del" @click="handleClick">删除</button>
</li>
`,
data: function() {
return {
value: Math.random()
}
},
methods: {
handleClick(e) {
console.log('点击删除按钮')
this.$emit('delete', this.title)
}
},
})
Vue.component('todo-list', {
template: `
<ul>
<slot></slot>
</ul>
`,
data: function() {
return {

}
},
})
var vm = new Vue({
el: '#app',
data: {
message: 'hello world',
list: [{
title: '课程1',
del: false
}, {
title: '课程2',
del: true
}],
},
methods: {
handleDelete(val) {
console.log('handleDelete', val)
}
}
})
</script>
</body>

</html>

理解单文件组件

意思是通过Vue CLI构建整个项目,而不是单个html文件。

双向绑定和单向数据流不冲突

v-model创建双向绑定

双向绑定:数据更新时,视图同步更新;反过来视图更新时,数据也会更新。可以通过v-model来创建双向绑定。

v-model

文档在表单输入绑定有说明:

v-model 在内部为不同的输入元素使用不同的属性并抛出不同的事件:

  • text 和 textarea 元素使用 value 属性和 input 事件;
  • checkbox 和 radio 使用 checked 属性和 change 事件;
  • select 字段将 value 作为 prop 并将 change 作为事件。

自定义组件的 v-model

.sync修饰符 创建双向绑定

.sync 修饰符

单向数据流

单向数据流

总结

  • Vue是单向数据流,不是双向绑定
  • Vue的双向绑定不过是语法糖
  • Object.defineProperty是用来做响应式更新的,和双向绑定没关系
  • v-model来实现双向绑定的实质是:属性的传递和事件的回调来做一个数据更新。所以说它仅仅是语法糖而已。

如何触发组件的更新

数据来源(单向的)

  • 来自父类元素的属性
  • 来自组件自身的状态 data
  • 来自状态管理器

状态data 和 属性props 区别

  • 状态是组件自身的数据
  • 属性来自父组件的数据
  • 状态或者属性的改变未必会让视图更新(只有做了响应才会更新,即放在了return里面)

合理应用计算属性和侦听器

 
计算属性computed

  • 减少模版中的计算逻辑
  • 数据缓存
  • 以来固定的数据类型(响应式编程)

侦听器watch中可以执行任何逻辑,如函数节流,Ajax异步获取数据,甚至操作com

总之,computed能做的,watch都能做,反之则不行;能用computed的尽量用computed;

生命周期的应用场景和函数式组件

生命周期图示

函数式组件

  • functional:true 可以将它看作一个方法
  • 无状态、无实力、没有this上下文、无生命周期

指令的本质是什么

源码演示

provide & inject

provide / inject

源码演示

解决跨组件间的属性传递问题。

获取跨层级组件实例

源码演示

template VS JSX

源码演示

Vuex

Vuex 是一个专为 Vue.js 应用程序开发的状态管理模式。它采用集中式存储管理应用的所有组件的状态,并以相应的规则保证状态以一种可预测的方式发生变化。

  • state,驱动应用的数据源;
  • view,以声明方式将 state 映射到视图;
  • actions,响应在 view 上的用户输入导致的状态变化。  

    在Vue中使用Vuex

源码演示

Vuex原理

  • State提供一个响应式数据
  • Getter借助Vue的计算属性computed来实现缓存
  • Mutation更改state方法
  • Action触发mutation方法
  • ModuleVue.set动态添加state到响应式数据中

Vue Router

Vue Router

源码演示

Nuxt

Nuxt

开发插件

vs code插件:Vetur:代码块功能

ESLint:代码规范、错误检查、

Prettier:代码规范提示

单元测试

三种方式:

  • jest或者mocha
  • @vue/test-utils
  • sinon
1
2
3
4
5
6
vue create XX
Manually select features
除了默认之外还需要勾选 Unit Testing
选用ESLint + Standard config
Lint on save
JEST

demo

实战

创建工程

1
➜  Vue_app git:(master) vue create  vue-app

手动选择

1
2
3
4
5
6
7
8
9
 ◉ Babel
◯ TypeScript
◯ Progressive Web App (PWA) Support
◉ Router
◉ Vuex
◉ CSS Pre-processors
◉ Linter / Formatter
❯◉ Unit Testing
◯ E2E Testing

其他选项

1
2
3
4
5
6
7
8
9
10
11
12
13
14
 ? Use history mode for router? (Requires proper server setup for index fallback in produc
tion) Yes
? Pick a CSS pre-processor (PostCSS, Autoprefixer and CSS Modules are supported by defaul
t): Less
? Pick a linter / formatter config: Prettier
? Pick additional lint features:
◉ Lint on save
❯◉ Lint and fix on commit
? Pick additional lint features: Lint on save, Lint and fix on commit
? Pick a unit testing solution: Jest
? Where do you prefer placing config for Babel, ESLint, etc.? In dedicated config files
? Save this as a preset for future projects? Yes
? Save preset as: vue-app
? Pick the package manager to use when installing dependencies: Yarn

启动

1
2
$ cd vue-app
$ yarn serve

安装两个依赖包(上面步骤创建工程时选择了Yarn构建,现在通过npm安装依赖包也是可以的原来)

1
npm i ant-design-vue moment

更改构建方式

文档说明

1
2
3
vi ~/.vuerc 
修改: "packageManager": "yarn", #或者是npm
source ~/.vuerc

我自己也重新操作了一下,项目构建成功之后的提示为

1
2
$ cd vue-app
$ npm run serve

webpack配置

1
2
3
4
5
6
7
8
9
10
11
12
13
14
15
16
17
18
19
 
ERROR Failed to compile with 1 errors 7:20:06 PM

error in ./node_modules/ant-design-vue/dist/antd.less

Module build failed (from ./node_modules/less-loader/dist/cjs.js):


// https://github.com/ant-design/ant-motion/issues/44
.bezierEasingMixin();
^
Inline JavaScript is not enabled. Is it set in your options?
in /Users/samtake/Documents/GitHub/Vue_app/vue-app/node_modules/ant-design-vue/lib/style/color/bezierEa
sing.less (line 110, column 0)

@ ./node_modules/ant-design-vue/dist/antd.less 4:14-188 14:3-18:5 15:22-196
@ ./src/main.js
@ multi (webpack)-dev-server/client?http://192.168.0.103:8086/sockjs-node (webpack)/hot/dev-server.js ./src/
main.js

css.loaderOptions

新建一个vue.config.js文件

1
2
3
4
5
6
7
8
9
10
module.exports = {
css: {
loaderOptions: {
less: {
// 这里的选项会传递给 css-loader
javascriptEnabled:true
}
}
}
}

重新启动构建npm run serve

按需加载

文档

配置babel.config.js文件

1
2
3
4
5
6
7
8
9
"plugins": [
["import", { "libraryName": "ant-design-vue", "libraryDirectory": "es", "style": true }] // `style: true` 会加载 less 文件
]

import {Button} from 'ant-design-vue';


npm i --save-dev babel-plugin-import

路由

同时刷新URL路径的插件

1
npm i nprogress

有两种加载方式,推荐这种:

1
component: { render: h => h("router-view") },

App.vue

1
2
3
4
5
6
7
8
9
10
11
<template>
<div id="app">
<div id="nav">
<router-link to="/dashboard/analysis">dashboard</router-link> |
<router-link to="/form">form</router-link>
</div>
<router-view />
</div>
</template>

<style lang="less"></style>

BasicLayout.vue

1
2
3
4
5
6
7
8
9
10
11
12
13
14
15
16
17
18
19
20
21
22
23
<template>
<div>
<Header />
<SiderMenu />
<router-view></router-view>
<Footer />
</div>
</template>

<script>
import Header from "./Header";
import Footer from "./Footer";
import SiderMenu from "./SiderMenu";
export default {
components: {
Header,
Footer,
SiderMenu
}
};
</script>

<style></style>

布局

Layout 布局

菜单和路由的结合

layouts文件夹是菜单的布局

router.js

  • 有name的才会渲染到菜单
  • 不渲染到菜单,可以添加标志位hideInMenu: true,
  • 如果不想让菜单的子路由渲染出来,可以添加标志位:hideChildrenMenu: true,

如何使用echarts第三方库

  • npm i XX
  • 在component文件夹中进行封装
  • 第三方库resize-detector的作用是监听空间大小变化
1
2
3
4
5
6
7
8
9
10
11
12
13
14
15
16
17
18
19
20
21
22
23
24
25
26
27
28
29
30
31
32
33
34
35
36
37
38
39
40
41
42
43
44
45
46
47
48
49
50
51
52
53
<template>
<div ref="chartDom"></div>
</template>

<script>
import echarts from "echarts";
import debounce from "lodash/debounce";
import { addListener, removeListener } from "resize-detector";
export default {
props: {
option: {
type: Object,
default: () => {}
}
},
watch: {
option(val) {
this.chart.setOption(val);
}
// option: {
// handler(val) {
// this.chart.setOption(val);
// },
// deep: true
// }
},
created() {
this.resize = debounce(this.resize, 300);
},
mounted() {
this.renderChart();
addListener(this.$refs.chartDom, this.resize);
},
beforeDestroy() {
removeListener(this.$refs.chartDom, this.resize);
this.chart.dispose();
this.chart = null;
},
methods: {
resize() {
console.log("resize");
this.chart.resize();
},
renderChart() {
// 基于准备好的dom,初始化echarts实例
this.chart = echarts.init(this.$refs.chartDom);
this.chart.setOption(this.option);
}
}
};
</script>

<style></style>

mock的使用

1.在mock文件夹创建对应的js文件
2.在vue.config.js配置对应的代理
3.axios像正常那样请求数据

1
2
3
4
5
6
7
8
9
10
11
12
13
14
15
16
17
18
19
20
21
devServer: {
proxy: {
"/api": {
target: "http://localhost:3000",
bypass: function(req, res) {
if (req.headers.accept.indexOf("html") !== -1) {
console.log("Skipping proxy for browser request.");
return "/index.html";
} else if (process.env.MOCK !== "none") {
const name = req.path
.split("/api/")[1]
.split("/")
.join("_");
const mock = require(`./mock/${name}`);
const result = mock(req.method);
delete require.cache[require.resolve(`./mock/${name}`)];
return res.send(result);
}
}
}
}

axios的使用

  • 切换环境的时候需要执行npm run serve:no-mock才会请求真实服务器
  • 一般都会对axios进行封装

表单的使用

表单的自动校验

分步表单(Vuex、Vue-router)

  • store-module-form.js

自己封装一个表单

components-ReceiverAccount.vue

C艹.jpg

demo链接🔗https://github.com/samtake/C-review

快速入门

内联函数

C++提供了程序内联机制来减少函数调用的开销。在函数定义的返回值类型前面加一个inline关键字,“建议”编译器函数代码复制到程序中,避免函数调用。

1
2
3
4
5
6
7
8
9
10
11
12
13
14
15
16
17
18
using std::cout;
using std::cin;
using std::endl;


inline double cube(const double side){
return side*side*side;
}

void testInlineFunction(){
double sideValue;
for (int i=1 ; i<=3 ; i++) {
cout << "enter the side length of your cube:";
cin >>sideValue;

cout << "side=" << sideValue << "cube=" << cube(sideValue) <<endl;
}
}

  • using std::cout;using语句使我们不用重复写std::前缀;或者使用using namespace std;代替。

引用以及引用形参

  • 两种传参方式是:按值传递和按引用传递。
  • 采用按值传递方式传参时,首先生成实参值的副本,然后将该值传递给被调函数。改变副本的值不会影响主调函数中实参的值。
  • 通过按引用传参,允许被调函数直接访问主调函数中的数据,允许被调函数有选择的修改主调函数中的数据。
  • 引用实参是其对应的函数调用中实参的别名。
  • 通过&来标记按引用传参

引用以和引用形参

1
2
3
4
5
6
7
int squareByValue(int number){
return number *=number;
}

void squareByReference(int &numberRef){
numberRef *=numberRef;
}

函数体内引用作为别名

1
2
3
4
5
int z = 3;
int &z_alias = z;//int &z_alias;
cout << "z= " << z << endl << " z_alias = " << z_alias << endl;
z = 7;
cout << "z= " << z << endl << " z_alias = " << z_alias << endl;

输出

1
2
3
4
z= 3
z_alias = 3
z= 7
z_alias = 7

并且为初始化的引用int &z_alias;会导致错误

1
Declaration of reference variable 'z_alias' requires an initializer

空形参列表

在C++中,可以用void指定也可以通过在括号内不写任何语句定义空形参列表。如下两个函数是等价的:

1
2
void print();
void print(void);

默认实参

  • 有些程序在多次调用一个函数时经常将相同的实参传递给某个形参,这种情况下,可以将该形参指定默认实参,即传递给该形参的默认值。
  • 当发生函数调用时,如果省略了对应位置上的实参值,则编译器就会重写该函数调用并将默认值作为实参插入到函数调用中,在执行被调函数时,以该形参的默认值进行运算。
  • 默认实参必须是函数形参列表中最右边的实参。
  • 应该在函数名第一次出现时指定默认实参–通常在函数原型中指定。
1
2
3
4
5
6
7
8
9
10
11
12
13
14
15
16
int boxVolume(int length = 1, int width = 1, int height = 1);

void testDefaultArgument(){
cout << "default = " <<boxVolume() << endl;

cout << "length = 2 : " <<boxVolume(2) << endl;

cout << "length = 2 , width =3 : " <<boxVolume(2,3) << endl;

cout << "length = 2 , width =3 , height = 4 : " <<boxVolume(2, 3, 4) << endl;
}


int boxVolume(int length, int width, int height){
return length*width*height;
}

一元作用域运算符

C++提供了一元作用域运算符,可以在含有与全局变量名的局部变量的域中访问该全局变量。

1
2
3
4
5
6
7
8
9
int number = 7;
void testUnaryOperation(){
double number = 10.7;

cout << "location number = " << number <<endl;

cout << "gloable number = " << ::number <<endl;

}

输出

1
2
location number = 10.7
gloable number = 7

函数重载

  • C++中允许定义同名的函数,只要这些函数具有不同的形参集合即可(至少在形参类型或形参个数或形参类型的顺序上有区别)。这个功能称为函数重载。
  • 调用重载函数时,C++编译器通过检查函数调用语句中的实参个数、类型及顺序选择适当的函数。
  • 重载函数由函数的签名进行区分。
  • 编译器根据函数形参的个数与类型将每个函数标识符编码,以保证类型安全链接,从而确保可以调用适当的重载函数,也确保实参与形参类型一致。
    1
    2
    3
    4
    5
    6
    7
    8
    9
    10
    11
    12
    13
    14
    void functionOverloading(){
    cout << square(7) <<endl;
    cout << square(0.5) <<endl;
    }

    int square(int x){
    cout << "integer : ";
    return x*x;
    }

    double square(double x){
    cout << "double : ";
    return x*x;
    }
    输出
    1
    2
    integer : 49
    double : 0.25

函数模版

重载函数用于对不同数据类型的程序逻辑执行相似操作。如果各种数据类型的程序逻辑和操作是完全相同的,那么使用函数模版可以更加简洁、方便的执行重载。

  • 所有函数模版定义均以关键字template开始,随后是用尖括号<>括起来的模版形参列表.
  • 模版列表中的每个形参(称为形式类型形参)前面都加关键字typenameclass。两者含义相同。
  • 形式类型形参是基本数据类型或用户定义类型的占位符
    1
    2
    3
    4
    5
    6
    7
    8
    9
    10
    11
    12
    13
    14
    template <class T>
    T maximum(T value1, T value2, T value3 ) {
    T maximumValue = value1;

    if (value2 > maximumValue) {
    maximumValue = value2 ;
    }

    if (value3 > maximumValue) {
    maximumValue = value3 ;
    }

    return maximumValue;
    }

类与对象

在C++中通常有main函数以及一个或多个既包含数据成员也包含成员函数的类构成,所以:

  • 在一个类中,可提供一个或多个成员函数。
  • 类似的,对象也有属性,在程序中使用对象时带有这些属性。这些属性是对象所属的类的一部分。

定义一个具有成员函数的类

1
2
3
4
5
6
7
8
9
10
11
12
13
14
//定义
class GradeBook {
//
public:
void displayMessage(){
cout<<"grade book"<<endl;
}
};

//调用
void funcTestGradeBook(){
GradeBook myGradeBook;
myGradeBook.displayMessage();
}

输出

1
2
3
Hello, World!
grade book
Program ended with exit code: 0
  • 类的定义由 class及随后的类名GradeBook开始,类名通常使用驼峰模式拼写,通常首字母大写。
  • 每个类体由左右打括号{} 括起来。
  • 类定义由;分号结束。
  • 成员函数的访问限定符有:publicprivateprotected三种。
  • 在定义函数时,必须指定返回值类型。
  • 成员函数名后的空括号表示该成员函数不需要传参。

定义一个有参成员函数

1
2
3
4
//定义一个有参成员函数
void displayMessageWithParms(string courseName){
cout<<"grade book"<< courseName <<endl;
}

调用

1
2
3
4
5
6
string courseName;
cout<< "enter course name:"<<endl;
getline(cin, courseName);
cout<<endl;
myGradeBook.displayMessageWithParms("Chinese");
myGradeBook.displayMessageWithParms(courseName);

输出

1
2
3
4
5
6
enter course name:
kjjkjkj

grade bookChinese
grade bookkjjkjkj
Program ended with exit code: 0

数据成员、set函数与get函数

  • 在函数定义体重声明的变量称为局部变量,它们只能在从声明它们的行到该函数定义的结束右打括号}的范围内使用。
  • 类通常包含一个或多个成员函数来操作属于该类特定对象的属性。属性在类定义中表示为变量。
1
2
3
4
5
6
7
8
9
10
11
12
13
14
15
16
17
18
19
class GradeBookHaveLocalVariable{
public:
void setCourseName(string name){
courseName = name;
}
string getCourseName(){
return courseName;
}

void displayMessage(){
cout<<"course name: "<< getCourseName() <<endl;
}
//定义一个有参成员函数
void displayMessageWithParms(string courseName){
cout<<"grade book"<< courseName <<endl;
}
private:
string courseName;
};

输出

1
2
course  name: 语文
Program ended with exit code: 0

用构造函数初始化对象

构造函数:

  • 用于在创建该类对象时初始化该对象。
  • 是一个特殊的成员函数,它的名字必须与类名相同。
  • 不能有返回值。
  • 通常声明为public
1
2
3
4
5
6
7
8
9
10
11
12
13
14
15
16
17
18
19
20
21
22
23
24
25
26
27
28
29
30
31
32
33
34
35
36
37
class GradeBookConstructor{

public:

GradeBookConstructor(string name){
setCourseName(name);
}

void setCourseName(string name){
courseName = name;
}

string getCourseName(){
return courseName;
}

void displayMessage(){
cout<<"course name: "<< getCourseName() <<endl;
}

//定义一个有参成员函数
void displayMessageWithParms(string courseName){
cout<<"grade book"<< courseName <<endl;
}

private:
string courseName;
};


void funcTestGradeBookConstructor(){
GradeBookConstructor myGradeBookConstructor1("Constructor");
GradeBookConstructor myGradeBookConstructor2("构造函数");

myGradeBookConstructor1.displayMessage();
myGradeBookConstructor2.displayMessage();
}

输出

1
2
3
course  name: Constructor
course name: 构造函数
Program ended with exit code: 0

用set函数验证数据

我们在.h文件中进行类的定义,并包含指定指定类的接口(类的public成员函数)的函数原形。

1
2
3
4
5
6
7
8
9
10
11
12
13
14
15
class VertifyWithSetFunc {
//instance variables

public:

VertifyWithSetFunc(string);

void setCourseName(string);
string getCourseName();

void displayMessage();

private:
string courseName;
};

在单独的源码文件中定义成员函数:每个成员函数名前面都有类名与二院作用域运算符::,这将每个成员函数绑定到声明成员函数与数据成员的VertifyWithSetFunc类定义上。

1
2
3
VertifyWithSetFunc::VertifyWithSetFunc(string name){
setCourseName(name);
}

我们知道可以通过set函数,可以修改private数据成员的值。这里我们要做的是在set函数进行值得判断。

1
2
3
4
5
6
7
8
9
10
void VertifyWithSetFunc::setCourseName(string name){
if (name.length() <= 10) {
courseName = name ;
}

if (name.length() > 10) {
courseName = name.substr(0, 10);
cout<< "name is long than 10 :"<< name << endl;
}
}

输出

1
2
3
name is long than 10 :test2test2test2test2test2test2test2test2test2test2
vertify1: test1
vertify2: test2test2

访问成员函数的三种方式

访问成员函数的三种方式:

对象名

1
2
3
4
Count counter;
counter.setX(1);
cout << "counter.setX(1);" ;
counter.print();

指向对象的指针

1
2
3
4
Count *counterPtr = &counter;
counterPtr->setX(2);
cout << "counterPtr->setX(2);";
counterPtr->print();

对象的引用

1
2
3
4
Count &counterRef = counter;
counterRef.setX(3);
cout << "counterRef.setX(3);";
counterRef.print();

输出

1
2
3
4
counter.setX(1);1
counterPtr->setX(2);2
counterRef.setX(3);3
Program ended with exit code: 0

析构函数

析构函数(destructor)是一种特殊的成员函数。

  • 类的析构函数名是在类名前加一个波浪好~
  • 累的析构函数是在删除对象的时候被隐式调用
  • 析构函数没有形参页不反悔任何值
  • 析构函数必须是 public类型的
1
2
3
4
5
6
7
8
9
10
11
12
13
14
15
16
17
18
19
20
21
22
23
24
25
26
27
28
29
30
31
32
33
34
35
36
CreateAndDestructor::CreateAndDestructor(int ID, string msg){
objectID = ID;
message = msg;

cout << "Object " << objectID << " 构造函数 runs " <<message << endl;
}


void create(void){
cout << "createFunc " << endl;
CreateAndDestructor fifth(5, "(local automatic in create)");
static CreateAndDestructor sixth(6, "(local automatic in create)");
CreateAndDestructor seventh(7, "(local automatic in create)");
}

CreateAndDestructor::~CreateAndDestructor(){
cout<<(objectID ==1 || objectID == 6 ? "\n" : "");

cout << "Object " << objectID << " 析构函数 runs " <<message << endl;
}


void testCreateAndDestructor(){
cout << "testFunc " << endl;
CreateAndDestructor second(2, "(local automatic in testFunc)");
static CreateAndDestructor third(3, "(local automatic in testFunc)");

create();


cout << "testFunc : " << endl;

CreateAndDestructor forth(4, "(local automatic in testFunc)");

cout << "\ntestFunc end \n" << endl;
}
1
2
3
4
5
6
7
8
9
10
11
12
13
14
15
16
17
18
19
20
testFunc 
Object 2 构造函数 runs (local automatic in testFunc)
Object 3 构造函数 runs (local automatic in testFunc)
createFunc
Object 5 构造函数 runs (local automatic in create)
Object 6 构造函数 runs (local automatic in create)
Object 7 构造函数 runs (local automatic in create)
Object 7 析构函数 runs (local automatic in create)
Object 5 析构函数 runs (local automatic in create)
testFunc :
Object 4 构造函数 runs (local automatic in testFunc)

testFunc end

Object 4 析构函数 runs (local automatic in testFunc)
Object 2 析构函数 runs (local automatic in testFunc)

Object 6 析构函数 runs (local automatic in create)
Object 3 析构函数 runs (local automatic in testFunc)
Program ended with exit code: 0
  • 在全局作用域内定义的对象的构造函数在该文件中的任何其他函数(包括main函数)开始执行之前执行。
  • main函数终止时,调用响应的析构函数。exit函数强制程序立即终止并且不执行自动对象的析构函数。
  • 自动局部对象的 析构函数在执行到达定义该对象的程序点是调用,对应的析构函数是在该对象离开该对像所在的作用域时调用。
  • static局部对象的析构函数只在执行第一次到达定义对象的程序点时调用一次,对应的析构函数是在main函数终止时或者exit函数时调用。

WebRTC介绍

WebRTC一个由google开源的音视频处理+即时通讯的开源库,优秀的多媒体、跨平台框架。它极其庞大复杂,换句话来说功能很强大,然后就是WebRTC只是定义了客户端的规范,至于服务器可以根据自己的业务场景来实现,一般应用于:

  • 音视频会议、在线教育
  • 照相机
  • 音乐播放器
  • 共享远程桌面
  • 录制
  • 实施人脸识别
  • 游戏
  • 文件传输工具
  • P2P网络加速
  • 即时通讯工具

WebRTC 1 对 1 音视频实时通话

过程示意图

即两个 WebRTC 终端(上图中的两个大方框)、一个 Signal(信令)服务器和一个 STUN/TURN 服务器。

WebRTC 终端负责音视频采集、编解码、NAT 穿越、音视频数据传输。步骤流程如下:

  • 获取权限(摄像头、麦克风)
  • 本地视频的采集与展示
  • 创建RTCPeerConnection
  • 媒体协商
  • 远端视频的展示

Signal 服务器负责信令处理,如加入房间、离开房间、媒体协商消息的传递等。
STUN/TURN 服务器负责获取 WebRTC 终端在公网的 IP 地址,以及 NAT 穿越失败后的数据中转。

NAT

Full Cone 完全锥型NAT
当 host 主机通过 NAT 访问外网的 B 主机时,就会在 NAT 上打个“洞”,所有知道这个“洞”的主机都可以通过它与内网主机上的侦听程序通信。
所谓的“打洞”就是在 NAT 上建立一个内外网的映射表。
大多数人都选用UDP作为打洞协议.

ip restrictedIP 限制锥型NAT
host 主机在 NAT 上“打洞”后,NAT 会对穿越洞口的 IP 地址做限制。只有登记的 IP 地址才可以通过。

IP 限制锥型 NAT 的映射表是一个 5 元组,即:

1
2
3
4
5
6
7
{
内网 IP,
内网端口,
映射的外网 IP,
映射的外网端口,
被访问主机的 IP
}

port restrected 端口限制型NAT

不光在 NAT 上对打洞的 IP 地址做了限制,而且还对具体的端口做了限制。因此,端口限制型 NAT 的映射表是一个 6 元组,其格式如下:

1
2
3
4
5
6
7
8
{
内网 IP,
内网端口,
映射的外网 IP,
映射的外网端口,
被访问主机的 IP,
被访问主机的端口
}

symmetric 对成型NAT
host 主机访问 B 时它在 NAT 上打了一个“洞”,而这个“洞”只有 B 主机上提供服务的端口发送的数据才能穿越,这一点与端口限制型 NAT 是一致的。

但它与端口限制型 NAT 最大的不同在于,如果 host 主机访问 A 时,它会在 NAT 上重新开一个“洞”,而不会使用之前访问 B 时打开的“洞”。也就是说对称型 NAT 对每个连接都使用不同的端口,甚至更换 IP 地址,而端口限制型 NAT 的多个连接则使用同一个端口,这对称型 NAT 与端口限制型 NAT 最大的不同.

NAT 类型检测步骤

  • 判断是否有 NAT 防护
  • 探测 NAT 环境

STUN协议

  • STUN存在的目的就是进行NAT穿越。
  • STUN是典型的客户端/服务器模式,即:客户端发送请求,服务端进行相应。

STUN有着两套规范,分别是:
RFC3489Simple Traversal of UDP Through NAT

RFC3489定义属性
| 属性 | 作用 | |
| :—–| :— | :—- |
| 0x001 | mapped-address | 获取客户端映射地址 |
| 0x002 | response-address | 指明对于mapped-address的相应应该由哪里发送 |
| 0x003 | change-request | 请求服务端使用不同的IP和端口发送响应 |
| 0x004 | souce-address | 制定服务器的IP和端口 |
| 0x005 | change-addresss | 它是change-addresss请求的响应 |
| 0x006 | user-name | 用于安全验证 |
| 0x007 | password | 用于安全验证 |
| 0x008 | message-integrity | 消息完整性验证 |
| 0x009 | error-code | 错误码 |
| 0x00a | unknow-attributes | 未知属性 |
| 0x00b | peflected-from | 拒约 |

RFC5389Session Traversal Utilities for NAT(它是UDP和TCP都有用到的)

TURN协议

  • 目的是解决堆成NAT无法穿越的问题
  • 其建立在STUN之上,消息格式使用STUN格式消息
  • TURN Client要求服务端分配一个公共IP和Port用于接收或发送数据

ICE框架

  • 收集Candidate(本机所有IP和制定端口)
  • 对Candidate Pair 排序
  • 连通性检查

什么是 Candidate?
它表示 WebRTC 与远端通信时使用的协议、IP 地址和端口,一般由以下字段组成:

1
2
3
4
5
6
7
8
9
{
IP: xxx.xxx.xxx.xxx,
port: number,
type: host/srflx/relay,
priority: number,
protocol: UDP/TCP,
usernameFragment: string
...
}

其中,候选者类型中的 host 表示本机候选者,srflx 表示内网主机映射的外网的地址和端口,relay 表示中继候选者。

SDP

SDPsession description protocol,它是一种信息格式的描述标准,本身不属于传输协议,但是可以被其他传输协议用来交换必要的信息。

RTP/RTCP

一般情况下,在实时互动直播系统传输音视频数据流时,我们并不直接将音视频数据流交给 UDP 传输,而是先给音视频数据加个 RTP 头,然后再交给 UDP 进行传输。

在使用 RTP 包传输数据时,难免会发生丢包、乱序、抖动等问题,但在处理这些问题之前,它首先要让各端都知道它们自己的网络质量到底是怎样的,这就是 RTCP 的作用。

各协议头字段如下,SSRC为共享媒体流的源。

RTP

RTCP

了解

FFmpeg是一个音视频处理库,提供了如 ffmpeg, ffplay, ffprobe,来编辑你的音视频文件。

安装

源码安装

1
2
3
4
5
6
7
8
9
10
11
12
13
14
15
16
17
18
19
20
21
22
23
24
25
26
27
28
29
30
31
32
33
➜  GitHub git clone https://git.ffmpeg.org/ffmpeg.git ffmpeg
Cloning into 'ffmpeg'...
remote: Counting objects: 588505, done.
remote: Compressing objects: 100% (120835/120835), done.
remote: Total 588505 (delta 471727), reused 581424 (delta 466456)
Receiving objects: 100% (588505/588505), 138.43 MiB | 2.74 MiB/s, done.
Resolving deltas: 100% (471727/471727), done.
Checking out files: 100% (7264/7264), done.
➜ GitHub cd ffmpeg
➜ ffmpeg git:(master) ls
CONTRIBUTING.md LICENSE.md ffbuild libpostproc
COPYING.GPLv2 MAINTAINERS fftools libswresample
COPYING.GPLv3 Makefile libavcodec libswscale
COPYING.LGPLv2.1 README.md libavdevice presets
COPYING.LGPLv3 RELEASE libavfilter tests
CREDITS compat libavformat tools
Changelog configure libavresample
INSTALL.md doc libavutil
➜ ffmpeg git:(master) ./configure --help
➜ ffmpeg git:(master) ./configure --help | more
Usage: configure [options]
Options: [defaults in brackets after descriptions]

➜ ffmpeg git:(master) ./configure --prefix=/usr/local/ffmpeg --enable-gpl --enable-nonfree --enable-libfdk-aac --enable-libx264 --enable-libx265 --enable-filter=delogo --enable-debug --disable-optimizations --enable-libspeex --enable-videotoolbox --enable-shared --enable-pthreads --enable-version3 --enable-hardcoded-tables --cc=clang --host-cflags= --host-ldflags=


报错、报错、报错、报错、
nasm/yasm not found or too old. Use --disable-x86asm for a crippled build.
ERROR: libfdk_aac not found
ERROR: speex not found using pkg-config
ERROR: libx264 not found

前面三种都可以通过brew install来解决,但是libx264怎么搞都拉不下。。。

通过brew安装

1
2
3
4
5
6
7
8
9
10
11
12
13
14
15
16
17
18
19
20
21
22
23
24
25
26
27
28
29
30
31
32
33
34
35
36
37
38
39
40
41
42
43
44
45
46
47
48
49
50
51
52
53
54
55
56
➜  ffmpeg git:(master) brew install ffmpeg
Updating Homebrew...
==> Installing dependencies for ffmpeg: aom,,,,

==> Caveats
gettext is keg-only, which means it was not symlinked into /usr/local,
because macOS provides the BSD gettext library & some software gets confused if both are in the library path.

If you need to have gettext first in your PATH run:
echo 'export PATH="/usr/local/opt/gettext/bin:$PATH"' >> ~/.zshrc

For compilers to find gettext you may need to set:
export LDFLAGS="-L/usr/local/opt/gettext/lib"
export CPPFLAGS="-I/usr/local/opt/gettext/include"
==> Caveats
libffi is keg-only, which means it was not symlinked into /usr/local,
because some formulae require a newer version of libffi.

For compilers to find libffi you may need to set:
export LDFLAGS="-L/usr/local/opt/libffi/lib"

For pkg-config to find libffi you may need to set:
export PKG_CONFIG_PATH="/usr/local/opt/libffi/lib/pkgconfig"


==> Caveats
==> gettext
gettext is keg-only, which means it was not symlinked into /usr/local,
because macOS provides the BSD gettext library & some software gets confused if both are in the library path.

If you need to have gettext first in your PATH run:
echo 'export PATH="/usr/local/opt/gettext/bin:$PATH"' >> ~/.zshrc

For compilers to find gettext you may need to set:
export LDFLAGS="-L/usr/local/opt/gettext/lib"
export CPPFLAGS="-I/usr/local/opt/gettext/include"

==> libffi
libffi is keg-only, which means it was not symlinked into /usr/local,
because some formulae require a newer version of libffi.

For compilers to find libffi you may need to set:
export LDFLAGS="-L/usr/local/opt/libffi/lib"

For pkg-config to find libffi you may need to set:
export PKG_CONFIG_PATH="/usr/local/opt/libffi/lib/pkgconfig"

==> unbound
To have launchd start unbound now and restart at startup:
sudo brew services start unbound
==> glib
Bash completion has been installed to:
/usr/local/etc/bash_completion.d
==> tesseract
This formula contains only the "eng", "osd", and "snum" language data files.
If you need any other supported languages, run `brew install tesseract-lang`.

brew info ffmpeg可以看到x264, x265这些包都是有安装的。升级则通过brew update && brew upgrade ffmpeg.

第二种方式安装连环境变量都不需要设置,完美极了。

目录及作用

  • libavcodec: 提供了一系列编码器的实现。
  • libavformat: 实现在流协议,容器格式及其本IO访问。
  • libavutil: 包括了hash器,解码器和各利工具函数。
  • libavfilter: 提供了各种音视频过滤器。
  • libavdevice: 提供了访问捕获设备和回放设备的接口。
  • libswresample: 实现了混音和重采样。
  • libswscale: 实现了色彩转换和缩放工能。

基本概念

音/视频流 在音视频领域,我们把一路音/视频称为一路流。如我们小时候经常使用VCD看港片,在里边可以选择粤语或国语声音,其实就是CD视频文件中存放了两路音频流,用户可以选择其中一路进行播放。

容器 我们一般把 MP4、 FLV、MOV等文件格式称之为容器。也就是在这些常用格式文件中,可以存放多路音视频文件。以 MP4 为例,就可以存放一路视频流,多路音频流,多路字幕流。

channel 是音频中的概念,称之为声道。在一路音频流中,可以有单声道,双声道或立体声。

参考链接:

https://blog.csdn.net/weixin_33985507/article/details/94470495

https://blog.csdn.net/leixiaohua1020/article/details/15811977

常量和变量

使用let关键字来声明常量

1
let temp = 10

使用var关键字来声明变量

1
2
var temp = 0
temp = 10

可以在一行中声明多个变量或常量,用逗号分隔

1
var x=0.1, y=10.1, z=1.0

类型标注

在声明一个变量或常量的时候提供类型标注,来明确变量或常量能够储存值的类型

添加类型标注的方法是在变量或常量的名字后边加一个冒号,再跟一个空格,最后加上要使用的类型名称

可以在一行中定义多个相关的变量为相同类型,用逗号分隔,只要在最后的变量名字后边加上类型标注

1
2
var msg: String
msg = "message"

变量和常量命名

几乎可以使用任何自负,甚至包括Unicode字符

不能包括空白字符、数学符号、箭头、保留的(或无效的)Unicode码位、连线和制表符。也不能以数字开头。

打印常量和变量

print

字符串插值

1
2
let str = "show string"
print("显示str\(str)")

数值类型

整数

8,16,32,64位编码的有符号和无符号整数(例如:UInt8,Int8)

通过min和max属性访问每个整数类型的最小值和最大值

Int,拥有与当前平台的原生字相同的长度;UInt,与平台长度相关的无符号整数。

1
print("UInt8 min \(UInt8.min), UInt8 max \(UInt8.max)")

浮点数

Double 64位浮点数,至少有15位数字的精度

Float 32位浮点数,至少有6位数字的精度

Bool

表示true和false

Swift的类型安全机制会阻止你用一个非布尔量的值替代掉Bool

数值范围

Swift_数值范围

类型别名

类型别名是一个为已存在类型定义的一个可选择的名字
typealias

1
2
typealias AudioSample = UInt8
let sample: AudioSample = 32

Tuple

使用Tuple组合多个值

元组把多个值合并成单一的复合型的值

元组内的值可以是任何类型,而且可以不必是同一类型

1
2
3
let error = (1, "没有权限")
print(error.0)
print(error.1)

元素命名

元组中的每一个元素可以制定对应的元素名称

如果没有制定名称的元素也可以使用下标的方式来引用

1
2
3
let error = (error: 1,  errorMsg: "没有权限")
print(error.error)
print(error.errorMsg)

Tuple修改

用var定义的元组就是可变元组,let定义的就是不可变元组

不管是可变还是不可变元组,元组在创建后就不能增加和删除元素

可以对可变元组的元素进行修改,但是不能改变其类型

Any类型可以改为任何类型

1
2
3
4
var error:(errorCode: Int, errorMsg:Any) = (errorCode: 1, errorMsg: "没有权限")
error.errorCode = 2
error.errorMsg = 3
print(error)

分解

可以将一个元组的内容分解成单独的常量或变量

1
2
3
4
let error = (1, "没有权限")
let (error, errorMsg) = error
print(error)
print(errorMsg)

如果只需要使用其中的一部分数据,不需要的数据可以用下划线_代替

1
2
3
let error = (1, "没有权限")
let (_, errorMsg) = error
print(errorMsg)

作为函数返回值

使用Tuple为函数返回多个值

返回值的Tuple可以在函数的返回类型部分被命名

1
2
3
4
5
func requestWithUrl(url: String) -> (errorCode: Int, errorMsg: String) {
return (1, "没有权限")
}
let error = requestWithUrl(url: "")
print(error)

Optional

通过在变量类型后面加?表示:这里有一个值,它表示x,或者这里根本没有值

可以通过给可选变量赋值一个nil来将之设置为没有值

在Swift中,nil不是指针,他是值缺失的一种特殊类型,任何类型的可选类项都可以设置成nil而不仅仅是对西那个类型

1
var str : String? = nil

Optional-if

可选项是没法直接食用的,需要用!展开之后才能使用

1
2
3
4
5
var str : String? = "abc"
if str != nil {
let cont = str!.count
print(count)
}

Optional-绑定

可以使用可选项的绑定来判断是否包含值,如果包含就把值赋给一个临时的常量或者变量

可选绑定可以与if和while的语句使用来检查可选项内部的值,并赋值给一个变量或常量

同一个if语句中包含多个可选项绑定时,用逗号分隔开即可。如果人一个选项绑定结果是nil或者布尔值为false,那么整个if判断会被看作false

1
2
3
4
5
var str : String? = "abc"
if let actualStr = str {
let cont = str!.count
print(count)
}

Optional-隐式展开

有些可选项一旦被设定值之后,就会一直拥有值,在这种情况下,就可以去掉检查的需求,也不必每次访问的时候都进行展开

通过在声明的类型后边添加一个叹号!而非问好来书写隐式展开可选项

隐式展开可选项主要被用于Swift类的初始化过程中

1
2
3
var str : String! = "abc"
let cont = str!.count
print(count)

Optional-可选链

可选项后面加问号

如果可选项不为nil,返回一个可选项结果,否则返回nil

1
2
3
4
5
6
var str : String? = "abc"
let cont = str?.count
if count != nil {
let lastIndex = count! - 1
print(lastIndex)
}

字符串

初始化空串

1
2
3
4
5
var emptyString = ""
var anotherEmptyString = String()
if emptyString.isEmpty {
print(Noting")
}

字面量

字符串字面亮是被双引号"包裹的固定顺序的文本字符

1
var str = "some string"

多行字面量

字多行符串字面量是被三个双引号"""引起来的一系列字符

开始和结束默认不会有换行符

反斜杠只会在代码阅读上方便,输出时没有实际的换行功能\

1
2
3
4
5
6
let str = """var emptyString = "" \
var anotherEmptyString = String() \
if emptyString.isEmpty { \
print(Noting") \
"""
print(str)

字符串里的特殊字符

转义特殊字符

任意的Unicode标量

1
2


扩展字符串分隔符

在字符串字面量中放置扩展分隔符来在字符串中包含特殊字符而不让它们真的生效

将字符串放在双引号内并由井号#包裹

如果字符串里有”#则首尾需要两个##(首尾##与包含的”#不一样即可)

如果你需要字符串中某个特殊符号的效果,使用匹配你包裹的#号数量的#号,并在前面添加转义符号\

1
2
let str = #"122\n\n444"#
let str = #"122\#n\n444"#

字符串的可变形

var 可修改
let 不可修改

字符串是值类型

String 值在传递给方法或者函数的时候会被复制过去

赋值给常量和变量的时候也是一样

操作字符

for-in 循环遍历String中的每一个独立的Character

Character类型

String值可以通过传入Character 数组来构造

1
2
3
4
5
for character in "abcdef" {
print(character)
}
let tempCharacters: [Character] = ["d","f","d","h"]
let str = String(tempCharacters)

字符串拼接

通过加运算符+创建新字符串

使用加赋值符号+=在已经存在的String值末尾追加一个String值

使用String类型的append()方法来给一个String变量的末尾追加character值

字符串插值

\(some) some代表:混合常量、变量、字面量和表达式的字符串面量

1
print(#"1 * 3 = \#(1*3)."#)

字符串索引

每个String值都有相关的索引类型,String.index,它相当于每个Character在字符串重的位置

startIndex属性来访问String中第一个Character的位置。endIndex属性就是String中最后一个字符后的位置

endIndex属性并不是字符串下表脚本的合法实际参数

如果String为空,则startIndex与endIndex相等

使用index(before:)和index(after:)方法来访问给定索引的前后

要访问给定索引更远的索引,你可以使用index(_:offsetBy:)

使用indices属性来访问字符串中每个字符的索引

1
2
3
4
5
6
let hello = "hello"
hello[hello.startIndex]
hello[hello.index(before: hello.endIndex)]
hello[hello.index(after: hello.startIndex)]
let index = hello.index(hello.startIndex, offsetBy: 2)
hello[index]

插入

插入字符,使用insert(_:at:)方法

插入另一个字符串的内容到特定的索引,使用insert(contentsOs:at:)方法

1
2
3
4
var welcome = "hello"
welcome.insert("!", at: welcome.endIndex)

welcome.insert(contentsOf: "ererer", at: welcome.index(before: welcome.endIndex))

删除

移除字符串remove(at:)

移除特定范围的字符串removeSubrange(range)

1
2
3
4
welcome.remove(at: welcome.index(before: welcome.endIndex))

let range = welcome.index(welcome.endIndex, offsetBy: -1)..<welcome.endIndex
welcome.removeSubrange(range)

子字符串

使用下表或者累死prefix(_:)的方法得到的子字符串是SubString类型

SubString拥有String的大部分方法

SubString可以转成String类型

1
2
3
4
let index3 = hello.lastIndex(of: "o") ?? hello.endIndex
let begin = hello[..<index3]

let newHello = String(begin)

字符串比较

字符串和字符相等性(==和==)

前缀相等hasPrefix(_:)

后缀相等hasSuffix(_:)

赋值和算术运算符

一元运算符、二元运算符、三元运算符

赋值运算符不会返回值

如何处理算术结果溢出

在默认情况下,当一个整数赋超过它容量的值时,Swift会报错而不是生成一个无效的数,给我们操作过大或者过小的数的时候提供了额外的安全性

同时提供了三个算术溢出运算符来让系统支持整数溢出的运算

溢出加法&+

溢出减法&-

溢出乘法&*

值溢出

溢出也会发生在有符号整形数值上

对于无符号与有符号整形数值来说,当出现上溢时,它们会从数值所能容纳的最大数变成最小的数。同样,当发生下溢时,它们会从所能容纳的最小数变成最大的数。

合并空值运算符??

合并空值运算符(a??b)如果选项a有值则展开,如果没有值,是nil,则返回默认值b

表达式a必须是一个可选类型。表达式b必须与a的存储类型相同。

实际上它就是相当于三目运算符_?_:_

1
2
3
func addTwoNum(num1: Int?, num2: Int2?) -> Int {
return (num1 ?? 0) +(num2 ?? 0)
}

区间运算符

闭区间运算符a...b

定义了从a到b的一组范围,并且包含a和b

a的值不能大于b的值

半开区间运算符a..<b

定义了从a到b但不包含b的区间

a的值不能大于b的值,如果a与b的值相等,那返回的区间将会是空的

单侧区间

比如说,一个包含数组所有的元素的区间,从索引2到数组的结束。在这种情况下,你可以省略区间运算符一侧的值。

1
2
3
4
5
6
7
for name in names[2...] {
print(name)
}

for name in names[...2] {
print(name)
}

倒序索引

1
2
3
for i in (0..<10>).reversed(){
print(i)
}

区间运算符在字符串上的运用

1
2
3
4
5
var welcome = "hello,world"
let range = welcome.startIndex...welcome.index(welcome.endIndex, offsetBy: -6)
welcome.removeSubrange(range)

print(welcome)]

区间运算符在比较类型上的运用

1
2
3
4
5
6
7
8
let welcome = "hello,world"
let interval = "a"..."z"

for c in welcome {
if !interval.contains(String(c)) {
print("\(c)不是小写字母")
}
}

位运算符

位取反运算符

位取反运算符(~)是对所有位的数字进行取反操作

位与运算符

位与运算符(&)是对两个数的比特位进行合并。它会返回一个新的数,只有当这两个数都是1的时候才能返回1。

位或运算符

位或运算符(|)是对两个数的比特位进行比较。它会返回一个新的数,只要两个操作位任意一个为1时,那么对应的位数就为1。

位异或运算符

位异或运算符(^)),当两个操作数的对应位不相同时,那么该数对应的位数就为1。

位左移和右移运算符

位左移(<<)和右移运算符(>>)可以吧所有位数的数字向左或向右移动一个确定的位数。

位座椅和右移具有给整数乘以或除以二的效果。将一个数左移一位相当于把这个数翻倍,将一个数右移一位相当于把这个数减半。

无符号整数的唯一操作

用0填充左移或右移后产生的空白位

有符号整数的移位操作

第一位表示整数还是负数(0正数,1负数)

位运算符应用

  • 两个数字交换
  • 求赋符号整形数二进制中1的个数
  • 判断一个整数是否为为2的整数次幂

Welcome to Hexo! This is your very first post. Check documentation for more info. If you get any problems when using Hexo, you can find the answer in troubleshooting or you can ask me on GitHub.

Quick Start

Create a new post

1
$ hexo new "My New Post"

More info: Writing

Run server

1
$ hexo server

More info: Server

Generate static files

1
$ hexo generate

More info: Generating

1
$ hexo new "new page title"

Deploy to remote sites

1
2
3
$ hexo deploy

$ hexo d --g

More info: Deployment

Markdown 表格
-: 设置内容和标题栏居右对齐。
:- 设置内容和标题栏居左对齐。
:-: 设置内容和标题栏居中对齐。

左对齐 右对齐 居中对齐
单元格 单元格 单元格
单元格 单元格 单元格

tyora 流程图文档